Because Linux systems dominate the cloud and many other environments, Linux administration skills (and the associated CompTIA Linux+ certification) are a core requirement for many different IT and developer jobs on the market, including the following:
- Systems administrators
- Cloud administrators
- DevOps specialists
- Cybersecurity analysts
- Penetration testers
- Forensics specialists
- Backend developers
- Frontend developers
- Full-stack developers
- Cloud developers
Linux systems are easy to administer and develop software for using PCs running Linux. They are also easy to administer and develop software for using Windows 10 alongside the Windows Subsystem for Linux.
However, if you have an Apple computer running macOS, you’ll find Linux administration and software development cumbersome at best. The Aqua desktop in macOS was designed to be easy to grasp for novice users, but has few features or software geared toward power users, including the job roles mentioned earlier.
Luckily, there are six tasks you can perform to make macOS more suitable for Linux administration and software development.
Before you continue reading, we assume you understand the usage and administration of the Linux operating system (i.e., the knowledge tested on the CompTIA Linux+ certification), as well as the basic structure of the macOS operating system.
6 Steps to Customizing macOS for Linux Administration
1. Install macOS a Second Time
You can easily (and safely) install macOS multiple times on the same system because Apple now uses the APFS filesystem, which supports multiple logical volumes on the same underlying partition.
Modern Macs come with a small ARM processor (called the T2 chip) that acts as the SSD storage controller, sound controller, touch bar controller, Trusted Platform Module (TPM) and more.
When you get a new Mac, the filesystem on the SSD is encrypted by default, and this encryption is performed entirely by the T2 chip. While this is generally a good thing for personal files, it causes havoc if you perform many small writes to the filesystem because the multipurpose T2 chip just can’t handle the load like other dedicated storage controllers can.
Thus, if you are running virtual machines, transferring large files or testing a web app using Docker or Kubernetes, it’s best to create another “work” installation of macOS alongside your default “personal” installation of macOS. This work installation of macOS should not be encrypted to ensure that the T2 chip can give you fast storage performance.
Each time you boot your Mac, hold down the Option key on your keyboard to get a menu that allows you to choose which macOS installation you want to boot (work or personal).
Another reason to install macOS a second time is that your personal and work installations can have different Apple IDs attached to them. This allows you to easily separate your personal Apple ID from one used solely for developing software or as part of an Apple Developer Program for your organization.
To install macOS a second time, you must first create a new APFS logical volume:
- Open Disk Utility (/Applications/Utilities/Disk Utility.app).
- Click the drop-down menu beside the View button in the toolbar and choose Show All Devices.
- Click the + button to create a new APFS volume.
- Specify a name for your APFS volume (e.g., work) and optionally set a Reserve (minimum) or Quota (maximum) size if you want to guarantee or limit the space the new logical volume can consume from the underlying partition, respectively.
Next, you can open the App Store, search for macOS Catalina and choose to download it (approximately 8GB). When the download has finished, the installation will start automatically.
At the beginning of the installation, you’ll be prompted to select the volume on which to install macOS. Simply choose the new volume you created (e.g., work) and proceed through the rest of the installation normally.
The new volume will not be encrypted, and the system will automatically boot into macOS installed on your new volume (unless you hold down the Option key at boot time and select your personal macOS installation).
Once you’re booted into your new macOS installation, you can set up your environment, as described in the following sections.
2. Install a Package Manager
In order to make macOS a useful workstation for Linux administration or development, you’ll need to install many different open source software packages.
Homebrew (or just brew) is a proper package manager for macOS that allows you to obtain open source software from GitHub and compile it (if necessary) to run on macOS with simple commands. For example, brew install neofetch will install neofetch, while brew install nvim will install neovim. You can also use brew to remove software or restart services that were installed via brew.
Most open source software that you’ll need for Linux administration or development can be installed using brew if there isn’t a pre-compiled app available from the software’s website or App Store. Moreover, if you work as a cybersecurity professional, there are hundreds of open source security tools that you may need to install using brew, depending on your needs.
To install brew, go to https://brew.sh and copy the command shown into a terminal window. This will first download the Xcode command line tools (approx. 2.5GB) before installing the brew system files.
3. Install a Better Terminal Emulator, Code Editor and Font Set
The three I’ve chosen below are the ones I use the most, but you may prefer alternate or additional ones depending on your needs. For example, you may wish to install additional Linux management tools or integrated development environment (IDE) software.
- iTerm is a feature-rich and fully customizable terminal emulator that replaces the limited one that comes with macOS (/Applications/Utilities/Terminal.app). You can download the iTerm app from https://www.iterm2.com. Next, you should move the downloaded iTerm2 app to your /Applications folder and create a link to it on your dock for easy access.
- Visual Studio Code is arguably the best text and code editor for Linux administration and development. In addition to being fully customizable, Visual Studio Code boasts many different features and troubleshooting tools that make it equally attractive to Linux administrators and developers. You can download the Visual Studio Code app from https://code.visualstudio.com. Next, you should move the downloaded app to your /Applications folder and create a link to it on your dock for easy access.
- Nerd Fonts provides a font set that is better suited toward Linux administrators and developers compared to the default font set provided by macOS. You can use Nerd Fonts in any app that allows you to customize the font set, as well as within macOS itself. You can install Nerd Fonts using the following brew commands:
brew tap homebrew/cask-fonts
brew cask install font-hack-nerd-font
4. Install an Automatic Tiling Window Manager
To organize your desktop in a way that matches Linux or Windows, you’ll need a proper window manager, such as yabai. In short, yabai manages the windows that you have on your system automatically so that everything is organized perfectly.
Unfortunately, to allow yabai to work, you have to disable two features of macOS System Integrity Protection (SIP). Doing so is quite minor from a security standpoint, and you’re only disabling them on your second (work) macOS installation, so it won’t affect your personal installation of macOS.
Once these two features are disabled, you’ll also notice a dramatic speed improvement when using macOS (for this reason alone, many macOS power users choose to disable it).
Follow these steps to disable these two features of SIP:
- Power down your computer and then boot it while holding down the Command (⌘) + R key combination to enter recovery mode.
- Log into your second installation of macOS when prompted.
- Select Terminal from the Utilities menu.
- Next, type the following command (ignore any warnings) and reboot normally afterwards:
csrutil enable --without debug --without fs
Following this, you can install yabai using brew, and then start and allow yabai to run on your system. The detailed steps to perform these tasks are listed on the yabai website.
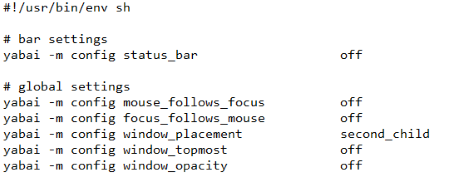
You’ll also need to create a ~/.yabairc file that contains your desired yabai configuration. The example yabairc file listed on the yabai website would likely suit your needs, and the options within are rather self-explanatory.
Click on the screenshot below to copy and paste my full ~/.yabairc configuration into your ~/.yabairc file, if you wish.
5. Install a Hotkey Daemon
As an IT professional, there is nothing more important than a set of customized keyboard shortcuts for everything you need to do. That’s where a hotkey daemon, such as skhd becomes useful.
You can install and start the skhd hotkey daemon using brew:
brew install koekeishiya/formulae/skhd
brew services start skhd
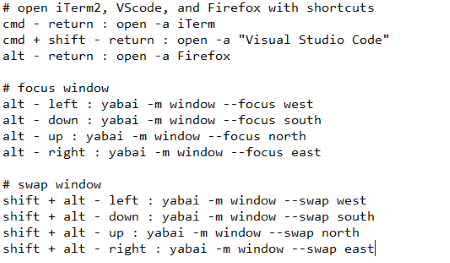
You’ll also need to create a ~/.skhdrc file with your desired configuration. While the example ~/.skhdrc file listed on the skhd website has plenty of great examples, click on the screenshot below for my ~/.skhdrc configuration that you can paste into your ~/.skhdrc file, if you wish.
In my ~/.skhdrc file, the first three lines set keyboard shortcuts for my iTerm, Visual Studio Code and Firefox apps (the open -a command searches /Applications for the name specified):
cmd + shift - return : open -a "Visual Studio Code"
alt - return : open -a Firefox
The remaining (many) lines of my ~/.skhdrc file create shortcuts that use yabai to modify window behavior.
For example, these four lines shift window focus:
alt - down : yabai -m window --focus south
alt - up : yabai -m window --focus north
alt - right : yabai -m window --focus east
You’ll want to spend time to look over and modify these ~/.skhdrc lines to suit your needs.
6. Clean Up Aqua and Install a Widget System
It’s also important to remove any visual distractions from your macOS desktop. To do this, open the System Preferences app and perform the following steps:
- Navigate to General and select the option to auto-hide the menu bar.
- Navigate to Dock and, select the option to move your dock position to the right of the screen (since we tile windows from left to right, this will maximize the vertical space used by them).
- While in the Dock section, also select the option to auto-hide the dock so that it stays out of view unless you need it.
Of course, there are always some things you’ll want to display on your desktop in the absence of a menu bar or dock. For these, you can install a widget system, such as Übersicht.
After you download the Übersicht app, move it to your /Applications folder and create a link to it on your dock for easy access.
The Übersicht website also has widgets that you can download and drag to your widgets folder. (You can see this folder by selecting Open Widgets Folder from the Übersicht menu in the top menu bar.)
To customize an Übersicht widget, edit the .jsx file in the widgets folder (they are written in JavaScript + React's JSX) and possibly the related .json file, depending on the widget.
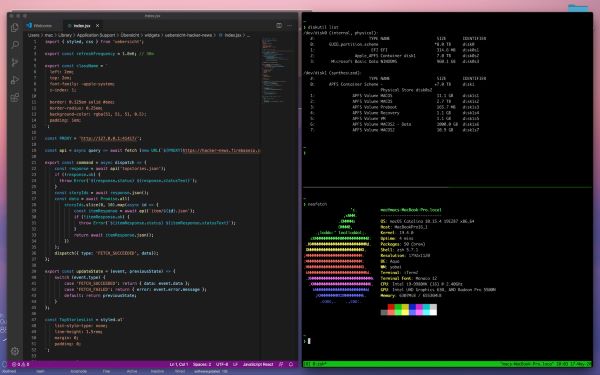
The three widgets I have on my desktop (shown below) display the top Hacker News posts in the upper left, system statistics and time information in the lower left and a random XKCD comic in the lower right.

Here’s the Mount Fuji wallpaper shown on my desktop.
When you open applications (using skhd shortcuts), their layout will be adjusted automatically by yabai as shown below.

In the above desktop, you’ll notice that I also use tmux in my iTerm2 terminal window to obtain multiple terminal sessions, as well as a starship prompt to maximize my terminal width.
Both of these can easily be installed using brew:
brew install starship
You must also add the following line to your ~/.zshrc for the starship prompt to work:
In summary, while macOS doesn’t boast the same power-user productivity features that a Linux or Windows 10 desktop has, you can perform these six tasks to customize it to suit your needs for Linux administration or development.
CompTIA Linux+ validates the skills employers need for Linux administrator jobs. Download the exam objectives to see what other Linux skills they look for.
Jason W. Eckert has been a UNIX (and later Linux) user/developer/sysadmin for more than 30 years, He has taught UNIX and Linux topics, including the vi text editor, in the college space for more than 20 years.


